![[Rod Stephens Books]](banner_300x110.png)
|
|
|
![[Build Your Own Python Action Arcade!]](book_action_arcade_80x100.jpg)
![[Build Your Own Ray Tracer With Python]](book_python_ray_tracer_81x100.png)
![[Beginning Database Design Solutions, Second Edition]](book_db2_79x100.png)
![[Beginning Software Engineering, Second Edition]](book_sw_eng2_79x100.png)
![[Essential Algorithms, Second Edition]](book_algs2e_79x100.png)
![[The Modern C# Challenge]](book_csharp_challenge_80x100.png)
![[WPF 3d, Three-Dimensional Graphics with WPF and C#]](book_wpf3d_80x100.png)
![[The C# Helper Top 100]](book_top100_80x100.png)
![[Interview Puzzles Dissected]](book_interview_puzzles_80x100.png)

Title: Overlay images and text to make exercise numbers with Python and PIL
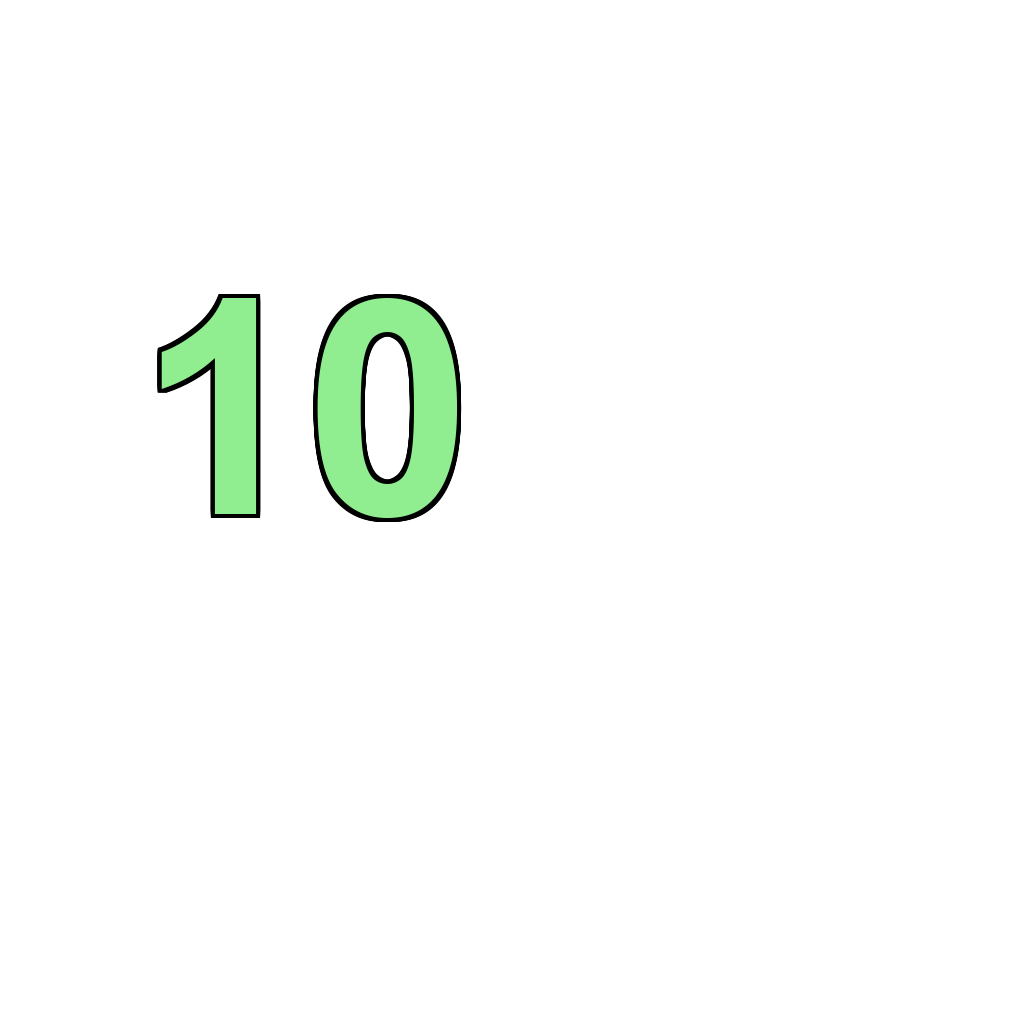
This is another program that I wrote for an upcoming book. I wanted an image like the one on the right but with different numbers. This presented several problems in PIL.
Yes, I know that's pretty confusing. The following pictures show the background image and masks. You can see how the program combines the number mask and the fixed mask to create the final mask.
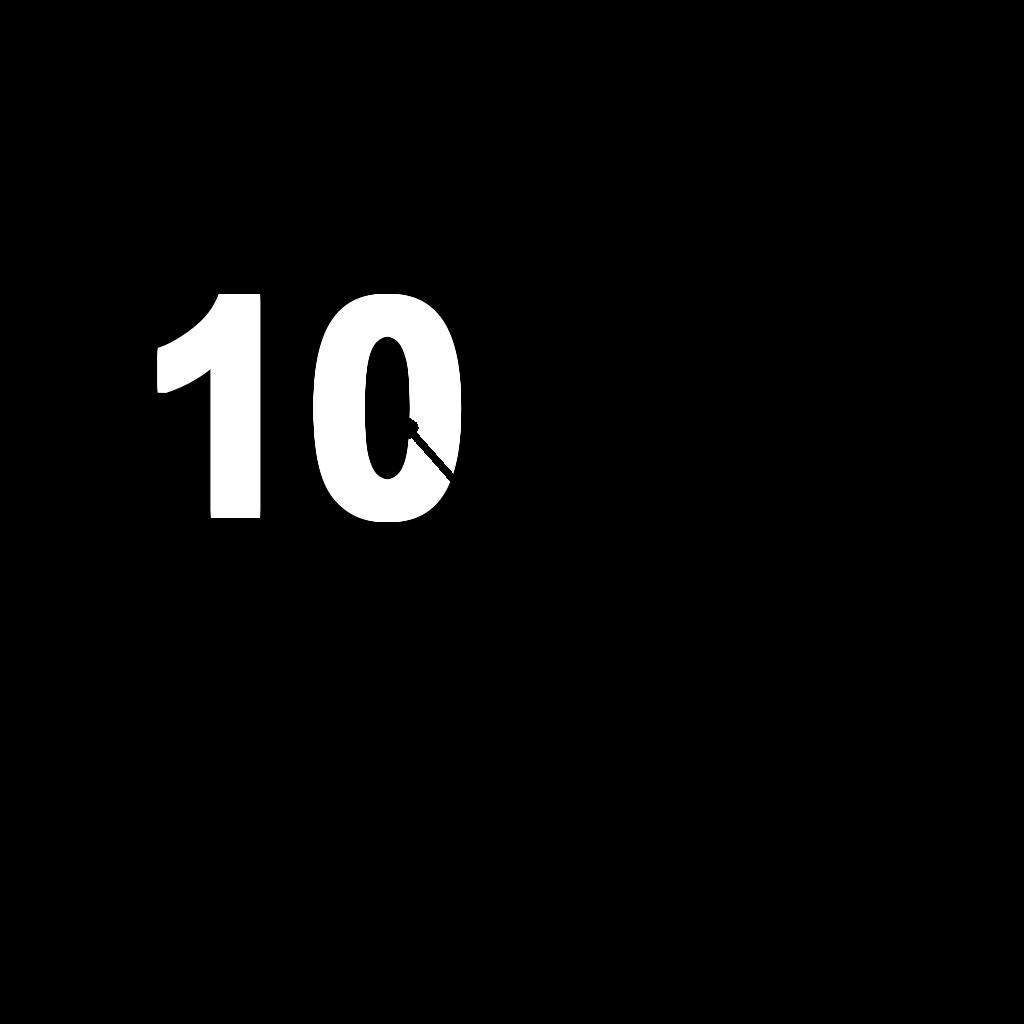
Here's the method's code. Look back at the list of steps to see what it's doing. def make_exercise_images(min_number, max_number): '''Make exercise images from min_number to max_number inclusive.''' # Load the background image. bg_image = Image.open('bg_image.jpg') # Make an image to hold the numbers. wid = bg_image.width hgt = bg_image.height fg_image = Image.new('RGBA', (wid, hgt), 'white') fg_dr = ImageDraw.Draw(fg_image) # Load the fixed mask in grayscale. fixed_mask = Image.open('fixed_mask.png').convert('L') # Make the number mask. number_mask = Image.new('L', (wid, hgt), 'black') number_mask_dr = ImageDraw.Draw(number_mask) # Make the final mask. final_mask = Image.new('L', (wid, hgt), 'black') final_mask_dr = ImageDraw.Draw(final_mask) # Define the numbers area. xmin = 40 ymin = 150 xmax = 570 ymax = 670 cx = (xmin + xmax) / 2 cy = (ymin + ymax) / 2 # Define the font. font_size = 300 font = ImageFont.truetype("arialbd.ttf", font_size) # Get the length of the largest number. digits = len(f'{max_number}') # Create the numbered images. for number in range(min_number, max_number + 1): print(number) # Clear the number mask. number_mask_dr.rectangle([0, 0, wid, hgt], fill='black') # Draw the number on the foreground and number mask images. text = f'{number}' text_color = 'lightgreen' outline_color = 'black' for i in range(5): for dx in range(-i, i + 1): for dy in range(-i, i + 1): fg_dr.text((cx+dx, cy+dy), text, font=font, fill=outline_color, anchor='mm', align='center') number_mask_dr.text((cx+dx, cy+dy), text, font=font, fill='white', anchor='mm', align='center') fg_dr.text((cx, cy), text=text, fill=text_color, font=font, anchor='mm', align='center') number_mask.save('final_mask.png') # Save for debugging. # Clear the final mask. final_mask_dr.rectangle([0, 0, wid, hgt], fill='black') # Paste the number mask onto the final mask but # only in places where the fixed mask is white. final_mask.paste(number_mask, (0, 0), fixed_mask) final_mask.save('number_mask.png') # Save for debugging. # Overlay the number picture on the background picuture but # only where the final mask is white. bg_copy = bg_image.copy() bg_copy.paste(fg_image, (0, 0), final_mask) # Save the result. bg_copy.save(f'exercise_{number:0{digits}d}.jpg') After all that, the main program makes the following call. make_exercise_images(1, 10) This creates the files exercise_01.jpg through exercise_10.jpg. (For the actual book, I've created the images through exercise_110.jpg. I'm not sure how many exercises there will eventually be.)Download the example to experiment with it and to see additional details. |
![[This image was made with a background image, mask, text, and text mask in Python and PIL]](pil_exercise_numbers.jpg)