|
|


|



Title: Use Pygame to animate an epitrochoid in Python
This example combines two previous examples: It really only uses the basic framework from the second example; any of my Pygame examples will do as a starting point.Processing EventsThe program is controlled by a main PygameEpitrochoidApp class. When you instantiate the class, its constructor saves a bunch of parameters like the radii of the circles that define the epitrochoid and the animation's speed. Here's the constructor's signature.def __init__(self, title, screen_size, max_fps, bg_color, inner_circle_color, outer_circle_color, point_color, curve_color, a, b, h, dt_per_second): The parameters are mostly self-explanatory. The less obvious ones are:
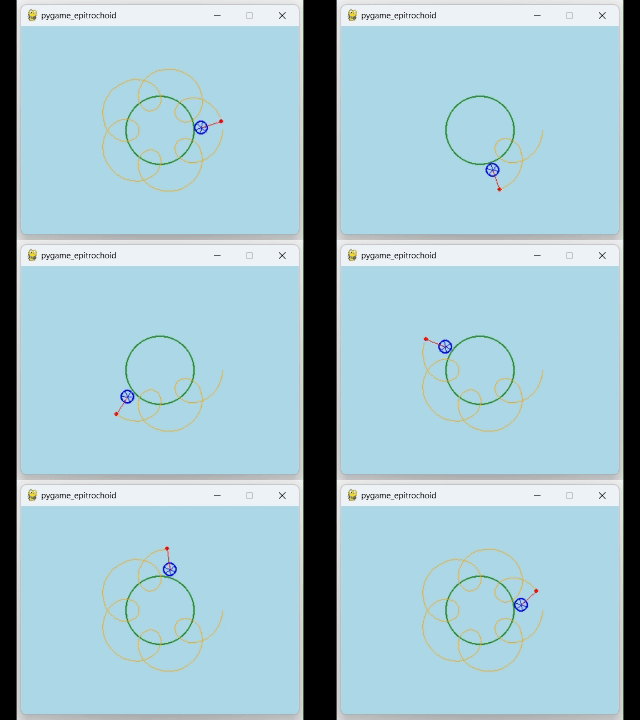
I'll say more about the parameters shortly. The constructor saves those parameters in object variables (I'm sure you know how to do that) and then calls the following event_loop method to run the animation. def event_loop(self): '''Process events.''' running = True clock = pygame.time.Clock() while running: # See if we should quit. for event in pygame.event.get(): if event.type == pygame.locals.QUIT: running = False break # Get elapsed time, convert into seconds, and calculate t. t = pygame.time.get_ticks() / 1000 * self.dt_per_second # Draw. self.draw(t) # Update the display. pygame.display.update() # Go no faster than the maximum number of frames per second. clock.tick(self.max_fps) # End the program. pygame.display.quit() pygame.quit() The event loop creates a clock to help with timing and then enters a while loop. Inside the loop, the code first loops through any pending Pygame events and looks for the QUIT message, which indicates the program is trying to close. If it sees QUIT, the code sets running to False to end the while loop.If the method doesn't see a QUIT message, it calls pygame.time.get_ticks to get the number of milliseconds that have elapsed since Pygame was initialized. It divides that by 1000 to convert into seconds and then multiplies by dt_per_second to see how much parameter t should have changed since the program began. Note that clock.tick also returns a time but it's different from pygame.time.get_ticks. The clock.tick method returns the elapsed time since the last time it was called. That's useful for some kinds of animation, but this program is simpler if you look at the total time since the program started instead. Next, the code calls the draw method to draw the epitrochoid and then calls pygame.display.update to update the display on the screen. The last statement inside the event loop calls clock.tick passing it the maximum number of frames per second we want to execute. That method makes Pygame sleep if necessary to ensure the program doesn't run faster than the desired number of frames per second. After the code sets running = False and ends the event loop, the code shuts down the Pygame display and closes Pygame. Drawing Circles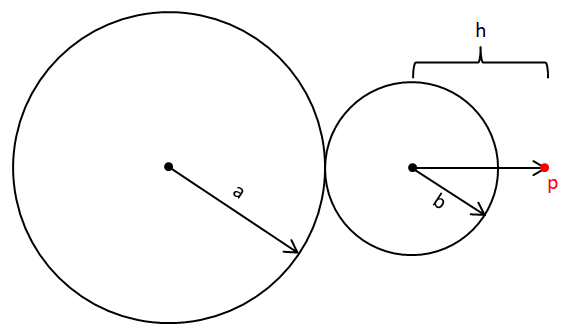 As my earlier epitrochoid example says, you draw an epitrochoid by tracing a point p attached to a circle of radius b rolling around a circle of radius a. (See the picture on the right.) The following draw method draws the circles and curve. def draw(self, t): '''Draw the current state of affairs.''' self.surface.fill(self.bg_color) # Draw the stationary circle. pygame.draw.circle(self.surface, self.inner_circle_color, self.center, self.a, width=2) # Draw the moving circle. dist = self.a + self.b cb = self.center + Vector2.from_polar((dist, math.degrees(t))) pygame.draw.circle(self.surface, self.outer_circle_color, cb, self.b, width=2) # Draw spokes on the moving circle. tb = t * self.a / self.b for phi in range(0, 360, 60): spoke_pt = cb + Vector2.from_polar((0.9 * self.b, phi + math.degrees(t + tb))) pygame.draw.line(self.surface, self.outer_circle_color, cb, spoke_pt, width=1) # Draw the line and point. p = cb + Vector2.from_polar((self.h, math.degrees(t + tb))) pygame.draw.line(self.surface, self.point_color, cb, p, width=1) pygame.draw.circle(self.surface, self.point_color, p, 3) # Draw the curve. points = get_epitrochoid_points( self.center, self.a, self.b, self.h, 0.05, t) if len(points) > 1: pygame.draw.lines(self.surface, self.curve_color, closed=False, points=points) 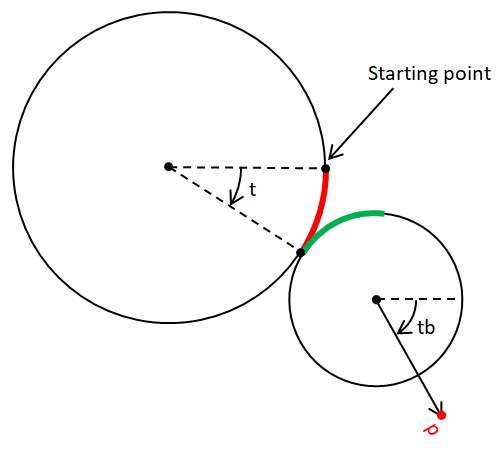 The parameter t gives the angle by which circle B has rotated around circle A as shown in the picture on the right. For convenience, let circle A be the inner, unmoving circle with radius a and let circle B be the outer, moving circle with radius b. Let Ca and Cb be the center points of the circles. The method first clears the drawing surface by filling it with the background color. It then uses pygame.draw.circle to draw circle A. That circle doesn't move so drawing it is relatively easy. Next, the code draws circle B. The only trick here is finding that circle's current center. The code uses vector arithmetic to find Cb relative to Ca. To do that, it first calculates the distance between the two circle's centers. You can see from the picture that this distance is a + b. The center Cb lies in direction t from Ca. The variable t is measured in radians (we need radians to calculate arc length shortly) so the code uses math.degrees to convert it into degrees. The method then uses Vector2.from_polar to get the vector pointing between the two circles' centers. (I don't know why Vector2.from_polar measures the angle in degrees when practically everything else uses radians, but they didn't ask me for input when they wrote that method.) The code then draws some spokes inside circle B. To do that, we need to know how much circle B has rotated. (You'll see why shortly.) If circle B has moved through angle t around circle A, then circle B has rotated through angle tb = t * self.a / self.b. (Briefly, the red and green arc lengths in the picture are the same. The red one is t×a×2π and the green one is tb×b×2π. Set them equal and solve for tb.) Now the code creates some vectors pointing in different directions, adds them to Cb to find the spokes' end points, and connects them to Cb. Notice that the angles used to draw the spokes equal tb plus angles that are fixed: 0, 60, 120, 180, 240, and 300. That makes the sum rotate as tb changes so they basically rotate as the circle does. (I added the spokes to make it easy to see that circle B was rotating without slipping on circle A. It was slipping in an earlier version of the program.) Having drawn both circles and the spokes, the code draws a line from Cb to the point p. To do that, it uses a calculation similar to the one it used to find the spoke endpoints and draws a line from Cb to point p. Finally, the method calls the get_epitrochoid_points function to get points along the curve from t = 0 to the current t value. Building the CurveThe following get_epitrochoid_points function returns points on the epitrochoid as t goes from 0 to current_t.def get_epitrochoid_points(center, a, b, h, dt, current_t): ''''Generate the epitrochoid's points.''' # Calculate the stop value for t. period = 2 * math.pi * lcm(a, b) / a current_t = current_t % period # Find the points. points = [epitrochoid_point(center, a, b, h, 0)] t = dt while t <= current_t: points.append(epitrochoid_point(center, a, b, h, t)) t += dt return points This function first calculates the period of the curve so it can clear and start over whenever t reaches a multiple of the period.Next, it sets current_t = current_t % period, which has the effect of making the curve start over when it reaches the period. For example, suppose the period is 4 and current_t is 4.01. The modulus operator truncates it to 0.1 so the curve starts over drawing points between 0 and 0.01. The function then creates a points list that initially holds the value of epitrochoid_point(center, a, b, h, 0). (I'll describe that function shortly.) The final parameter to that function is t = 0, so it returns the first point on the curve. Next, the code enters a loop that makes t step from 0 to current_t in increments of dt. (If you want to make that loop more elegantly, see my post Implement a floating-point range function in Python.) Inside the loop, the code calls epitrochoid_point, adds the result to the points list, and increases t by dt. After it finishes finding the points, the function returns them. Finding Curve PointsThe following code shows the epitrochoid_point function that calculates points on the curve for different values of t.def epitrochoid_point(center, a, b, h, ta): '''Calculate the coordinates for a point on the epitrochoid.''' tb = ta * a / b cb = center + Vector2.from_polar((a + b, math.degrees(ta))) p = cb + Vector2.from_polar((h, math.degrees(ta + tb))) return p This code takes steps similar to the earlier code that draws the circles and point p. It calculates the amount tb by which circle B has rotated, uses Vector2.from_polar to get a vector from Ca to Cb and adds that vector to Ca to find Cb.Next, it uses Vector2.from_polar again to get the vector from Cb to point p and adds that to Cb to get p. The code then returns p. To summarize, the event_loop method loops (hence the name) and periodically calls draw. The draw method draws the circles, calls get_epitrochoid_points to get the curve's current points, and then draws those points. ConclusionThis example demonstrates several techniques including:
The final result makes it pretty easy to visualize how an epitrochoid is generated. Download the example to experiment with it and to see additional details. |