![[Rod Stephens Books]](banner_300x110.png)
|
|
|
![[Build Your Own Python Action Arcade!]](book_action_arcade_80x100.jpg)
![[Build Your Own Ray Tracer With Python]](book_python_ray_tracer_81x100.png)
![[Beginning Database Design Solutions, Second Edition]](book_db2_79x100.png)
![[Beginning Software Engineering, Second Edition]](book_sw_eng2_79x100.png)
![[Essential Algorithms, Second Edition]](book_algs2e_79x100.png)
![[The Modern C# Challenge]](book_csharp_challenge_80x100.png)
![[WPF 3d, Three-Dimensional Graphics with WPF and C#]](book_wpf3d_80x100.png)
![[The C# Helper Top 100]](book_top100_80x100.png)
![[Interview Puzzles Dissected]](book_interview_puzzles_80x100.png)

Title: Build standard menus in Python and tkinter
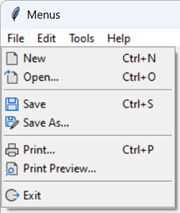
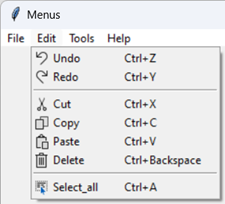
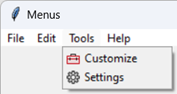
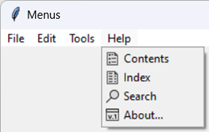
This program shows how you can add standard menus (including menu icons and accelerators) to a Python application that uses tkinter. The following pictures show the menus.
The program initializes tkinter and creates a main window as usual. It then calls the following build_menus method to create the menus. def build_menus(self): '''Build the menu bar.''' menu_bar = tk.Menu(self.window) self.window.config(menu=menu_bar) self.build_file_menu(menu_bar) self.build_edit_menu(menu_bar) self.build_tools_menu(menu_bar) self.build_help_menu(menu_bar) This method creates the window's main menu bar and then calls other methods to build each of the menus on that menu bar. Those methods are all pretty similar so I'll just describe part of the build_file_menu method. The following code shows how that method begins.
def build_file_menu(self, menu_bar): '''Build the File menu.''' file_menu = tk.Menu(menu_bar, tearoff=False) menu_bar.add_cascade(label='File', menu=file_menu) # New self.new_photo_image = ImageTk.PhotoImage(file='new.png') file_menu.add_command(label='New', accelerator='Ctrl+N', compound='left', command=self.mnu_new, image=self.new_photo_image) self.window.bind('<Control-n>', lambda event: self.mnu_new()) ... file_menu.add_separator() ... The method first creates the File menu and adds it to the main menu bar.The tearoff property determines whether the user can pull the menu out of the menu bar and make it free-floating. Most applications don't allow that so it's odd that the default allows that behavior. The code here sets the value to False. Feel free to change that if you like. Next the code makes a PIL PhotoImage and uses it to create a menu item. The following list describes the parameters used by this example.
The program's code builds a few other menu items and calls add_separator where needed to add a separator to the menu. Omitting Image and AcceleratorIf you don't want an image, (1) don't load it and (2) omit the compound and image parameters.If you don't want an accelerator, (1) omit the accelerator parameter and (2) don't bind a key combination for the command. Here's an example that doesn't use an image or accelerator. edit_menu.add_command(label='My Command', command=self.mnu_my_command) Important NotesThere are a couple of other important things to note about this example. First, you must save the PhotoImages in persistent variables so tkinter can redraw the images as needed. That's why the PhotoImage is saved in self.new_photo_image.I took the images used in this program from the Visual Studio 2022 Image Library. You can download it and other versions at Microsoft's Download Center. The images I used are 16×16 pixels in size. If you use larger images, tkinter will happily display them. However, if the images are too wide, they push the text to the right. Then if some commands do not have images, they won't line up properly. This wasn't an issue for 16×16 pixel images but was a problem with 21×21 pixel images. To work around that problem, give every command an image. If a command shouldn't have an image, give it a completely transparent image that's the same size as the images used by the other commands. The following code shows the mnu_new method that's called whenever you select the New menu item or press Ctrl+N. def mnu_new(self): print('New') This method simply prints "New." You should modify it to do whatever is appropriate for your program.One way you can use this example is to download it and copy and paste the menu code into your program. Then you can remove or comment out the pieces that create any menus that you don't want to use. Download the example to see all of the details. |
![[Build standard menus in Python and tkinter]](tkinter_menus.png)